Thursday, March 7, 2013

Wedding Beauty Prep

"There is no definition of beauty, but when you can see someone's spirit coming through, something unexplainable, that's beautiful to me." — Liv Tyler

Everyone wants to look their absolute best on their wedding day, which is why so many people choose to hire a professional makeup artist. But how do you get the most out of your makeup? Here are some great tips from Liz Washer, a makeup artist recognized for her natural touch and eye for color. You can see some of her wedding work here.

Beauty begins with the skin
The better the condition of your skin, the better your makeup will look. However, dramatically  changing your regimen in the weeks before the wedding can create MORE breakouts and other skin reactions. If you want a facial, make sure to do so no later than a week (preferably two) before your wedding – your skin needs the recovery time. Continue using the products your skin is accustomed to, with extra attention to moisturizer, sunscreen, and lip balm. 

Wedding day eve
The day before, gently exfoliate to remove any flakes or dead skin on your face and lips. Sugar mixed with honey, olive oil, or lip balm makes a great lip exfoliator! Avoid the use of overly scratchy ingredients (such as ground walnut shells).

You are what you eat
What you put into your body affects your skin, so drink as much water as possible to keep yourself hydrated and to aid in skin renewal. Nutrition affects the health of your skin, particularly if you have any food allergies or sensitivities, so be sure to consult a doctor well in advance if you have concerns about your diet, or a dermatologist if you have specific questions about skincare, acne, etc.
 

Wax on, wax off
Don’t leave any form of facial depilation – especially waxing – to the last minute (a week beforehand is best). In addition to leaving redness behind, waxing can temporarily create an unnaturally smooth surface, preventing makeup adhesion. If you’re taking medication or using a topical acne treatment, remember that your skin is probably drier and more prone to being damaged by waxing. (If you have specific questions about your eyebrows, contact Liz in advance for recommendations.)

Sun-kissed skin
If you’d like a spray tan for the wedding, it should be done in advance so the color has time to soften and settle so it doesn’t stain. Only use self-tanning products if you are experienced with application and familiar with the product’s durability, as they can also stain your garments (not to mention your palms!) Whatever you do, don’t go too dark or orange – stay within a natural range for your skin tone.
 

Mirror mirror
Avoid using magnifying mirrors – they encourage excessive picking and plucking (and irrational levels of insecurity!)

Got ink?
If you will be having tattoos or any large areas of skin concealed on the wedding day, be sure to shave the area thoroughly on the morning of, including up to an inch of the surrounding skin – this will help the full-coverage makeup to lie flush and blend well. (There is generally no need to shave or wax your face prior to makeup application, but feel free to contact Liz if you have questions about facial hair.)

Sleeping beauty
Get as much sleep as possible, drink lots of water, and if you feel puffy on the morning of, refrigerated cucumber slices will soothe the skin around your eyes.


Questions about timing for your makeup on your wedding day? You can read more about that on Liz's blog, or contact us and we can help you coordinate all of those details so that you can relax! On your wedding day, you want to feel beautiful and pampered, and we want that for you as well.

Thursday, February 28, 2013

Wedding Invitations

One of the most common questions couples ask us during the wedding planning process is "How do I address invitations?" or "Should I hand address or print labels?" or "When should I mail my wedding invitations?" So many couples find themselves at a loss when it comes to selecting, addressing, and mailing their invitations. The process does not have to be a complicated one if you have the right guidance.

Invitation design by Eutopia Events


First Impressions are Everything: Your wedding invitation is the first glimpse your guests get of your wedding. It should reflect your wedding style, taste, and clue your guests into what kind of affair you are hosting. Paper, color, wording—carefully selecting your invitations will create a lasting impression with your guests.

Timing is Key: Plan to mail your invitations 8 weeks prior to your wedding date (6 weeks if you mailed save-the-dates). This will allow your guests adequate time to respond. Your RSVP date should be set around when your venue or caterer needs a final guest count.

Addressing the Envelope: Invitations can be addressed in a variety of ways. You can follow tradition, or there are also some modern alternatives. Here are just a few examples.

• When addressing to a married couple, it could be written to Mr. & Mrs. Johnson or Mr. and Mrs. Richard Johnson. The inner envelope, if one, could read Richard and Joan Johnson, or simply, Richard and Joan.

• For a couple living together, but not married, you will want to address each of their names on a separate line alphabetically by last name.

• For a couple in which one is a doctor and the other is not, the doctor should be listed first, followed by their spouse’s name, for example: Doctor Maria Vazquez and Mr. Juan Vazquez.


Handwritten or Calligraphy: Invitations should always be hand-addressed, either by the couple, a friend or family member with nice handwriting, or by a calligrapher. Following this rule of thumb demonstrates to your guests that great care has been taken to personally invite them to your wedding. Invitations should not be mailed to guests with printed labels.

Spell it Out: When addressing invitations, spell out all of the words in an address. “St.” should be spelled out as “Street” or P.O. Box should appear as Post Office Box. This applies also to the State Name. House or apartment numbers smaller than 20 should be spelled out as well.

On the Return: Your return address should also be completely spelled out. However, you could have a stamp made, or have the return address printed directly on the outer envelope. The same applies to the RSVP envelope. You should never use labels.

You’ve Got Mail: This is one of the most important and cost-saving pieces—before you physically adhere stamps to your invitations, bring one complete set to the post office and have it measured and weighed. This will ensure you place adequate postage on your invitations, and that they will make it to their destination and not be returned. You should also include postage for the RSVP card. You may also want to research postage cost for your invitation prior to selection based on weight and size. For example, a square invitation requires more postage than a traditional rectangular-shaped one.

There are many resources available offering advice and etiquette guidance online, or ask your invitation designer, calligrapher, or wedding planner for assistance. Learning these details prior to sending your invitations will help with a much smoother and more pleasant experience.

Friday, February 22, 2013

Love is Sweet!

We were feeling nostalgic when we were brainstorming ideas for a candy display last month. We were head-over-heels in love with the idea of mixing vintage and romantic elements with lots of sweet and beautiful treats.

The display will be up until March at Bancroft Bridals in Feeding Hills, MA. Be sure to stop by the shop and let the beautiful ladies there help you find your dream wedding gown! While you are there, enjoy the delicious treats from the Love Notes display and enter our contest for a chance to win $200 off of any planning package! Come prepared to write a Love Letter for your sweetheart, we'll be selecting the best note April 1st!


Thank you Michelle Girard Photography for taking some pictures of the display for us! You can see more pictures of the display on her blog.

Thank you also to Megan Chapin Calligraphy and Durocher Florist. 

Tuesday, February 19, 2013

Industrial Meets Vintage

When Dani of Dani Fine Photography approached us about collaborating on a styled boudoir shoot earlier last year, we didn't hesitate for a moment to agree to it! We have done several styled wedding shoots, but haven't had the opportunity to bring our ideas into boudoir photography, and we were definitely up for the challenge!

The shoot took place at the Strathmore Paper Mill in Turners Falls, MA. It was the perfect industrial setting we were looking for. Our vision was to combine a soft vintage-style with the rough and tough background of the mill. We felt the contrast of these two styles worked amazingly. Who knew chipping paint could be so beautiful! Our vision was successfully executed with the help of a very talented group!


We are thrilled that the shoot was picked up by Storyboard Wedding and Savvy Deets Bridal! You can see the Boudoir featured on Storyboard here and for Savvy Deets here. You can also visit Dani Fine Photography to see more from the photo shoot.


© Dani Fine Photography

We enjoyed collaborating with these amazing professionals. Thank you!
Photography: Dani Fine Photography
Hair and makeup: Crystal Vazquez & Company
Lingerie: Gazebo
Model: Lily  

Thursday, February 14, 2013

Love is in the Air!

Love is in the air! This Valentine’s Day we imagine there will be a few more engaged couples out there. Saying YES is only the beginning! After the proposal, and some time to revel in the moment, a couple begins their journey together planning their wedding. Some couples know exactly where to begin where others need a little help to get started.

We’ve put together a short list of places to start in the wedding planning process. With the right guidance, your dream wedding can come together quickly and beautifully! 


Start off Organized!
Purchase an accordion organizer or a binder to keep all of your wedding planning pieces. Label each folder or tab with various areas of wedding planning—church, rings, cake, wedding planner, photographer, music, etc.—where you can keep everything in its place.

Develop Your Wedding Budget
Begin to gather all your resources—parents, in-laws, your own contributions—and develop an overall budget for the wedding. Include everything from the wedding dress, bridal party gifts, decor, the rings, and the honeymoon. You can find wedding budget worksheets on popular sites such as Weddin
gWire, or enlist the guidance of your wedding planner. These worksheets help you to breakdown your budget into the amounts you should allocate for each area of the wedding.

Create the Guest List
Your guest list could be a determining factor for your budget. A lower budget might dictate you will need to keep your guest list small and intimate. Create an initial list to give you a sense of your total number. In some cases, parents may like to suggest some guests for the list as well, so be sure to add their list to yours.


Make Your Wish List
Spend some time talking with your fiance about what your ideal wedding would look like. Think about the location, the food, the overall experience you want for your guests and yourselves. You will also want to make sure both of your needs are met in terms of your vision. Do you have your heart set on
having an organic menu or perhaps you are searching for a rustic venue? Do you want a band, a DJ, or maybe additional options for entertainment? Spend some time talking about what each of you would love to see as part of your wedding day so that your wedding fits your specific personalities and style.

Hire a Wedding Planner or Day-of Coordinator (psst...you should hire us!)
For some, the assistance of a wedding planner or day-of coordinator is an important place to start. You’ll want to find someone you feel comfortable with since you will be working with her/him over a long period of time. A Wedding Planner can be involved as much or as little as you need them to be. They can also help you save a great deal of time, money and frustration. So many couples find themselves stressed and over budget, which is not where you want to be during the wedding planning process. As wedding planners, we can keep you focused, on task, and well informed of the process.

Select a Venue
Many places book out a year or more in advance. If you are looking for a venue that could accommodate your ceremony and reception, your options might be narrowed down a bit. There are many gorgeous wedding venues throughout New England. It is a matter of finding the right place that suits your wedding vision and budget. 


These are just a few steps to get you started. If you are recently engaged and are looking for wedding planning guidance, we always provide a free consultation to our clients. You can contact us at eutopiaevents@gmail.com to schedule an appointment.

Friday, December 21, 2012

Aloha Au Ia 'Oe (I Love You!)

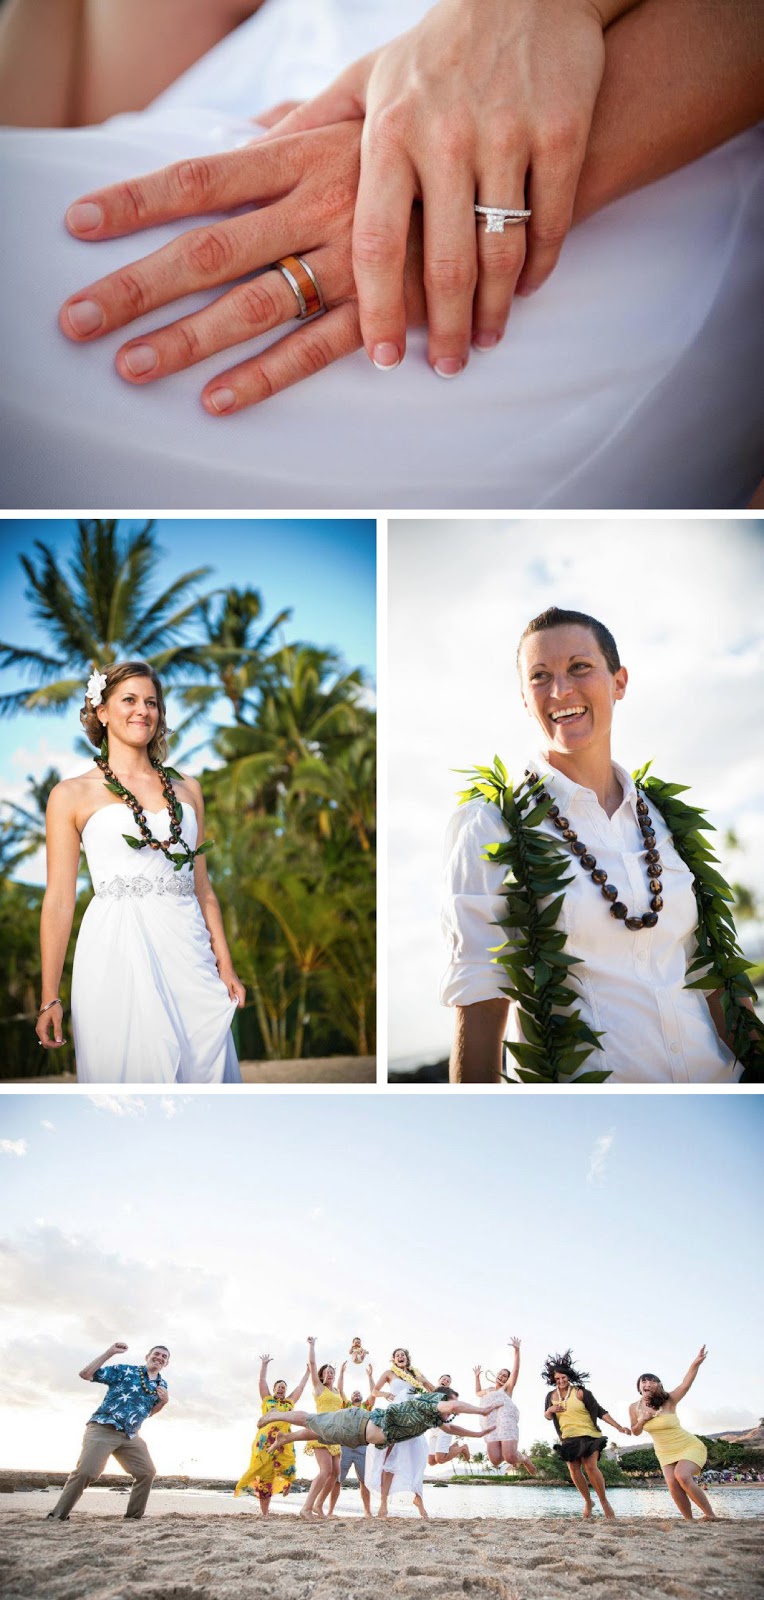
Over the summer, Lauren's sister and her girlfriend had a civil union ceremony in Hawaii where they live. (While most people can only dream about having a honeymoon in Hawaii, they actually live the dream everyday!)

Unfortunately, same-sex marriage is not yet legal in Hawaii, but they do permit civil unions. Along with a small group of family and friends dressed in tropical garb and cheery yellow attire, Julie and Christina joined together in a binding union, and in love.


They both chose Hawaiian sayings to have engraved on the inside of their rings. Julie's has ku'uipo (sweetheart) and Christina has ho'oulu like (to grow together).

As a gift, we designed and created a Quaker union certificate, where all of the witnesses of the union sign the document. It makes for a great framed memento and personal keepsake of a truly special day. 


Ho'omaika'i 'Ana (Congratulations) Julie and Christina!

Photos by Joseph Esser Photography